Pioneer NAV-SYS900DVD GPS Car Navigation System
Reviewed by Daniel Mohabir (9/1/02)
When I decided to install an after-market navigation system into the Trailblazer, I decided to research the best possible unit. At first I was focusing on just the Navigation system. I already have an AM/FM/CD player (OEM) installed in the vehicle and I was perfectly happy with it. With this in mind, I was leaning toward the Magellan 750 Nav. This is the same as Hertz Neverlost. I have used GPS systems in the past. I have a GarminEMap and I have used the Hertz Neverlost in rental cars. I love the Neverlost. It has always helped me to navigate in unknown cities. That is why I wanted to get it for my vehicle. I have also used the Pocket CoPilot on my Casio Pocket PC. This worked well for what it was intended to do. But you cant store large map areas and you have to load new maps if you are traveling a long distance. It worked well. But you have to remember to load the maps that you need.
The other units were unknown to me. And, in spite of searching the web for reviews of the other units, I came up empty. But one thing I did not like with Neverlost was the small screen. I decided to see what else was available. I started to research the following:
-
Pioneer NAV-SYS900DVD
-
Alpine
NVE-N852A Navigation Unit with the IVA-C800 motorized display
The
cheapest price that I could find for the Alpine
NVE-N852A Navigation Unit with the IVA-C800 motorized display was $2700
US. The Pioneer
NAV-SYS900DVD was $1923 US. Almost $800 less for the Pioneer unit and it
could also play DVDs. The kids will love me on long trips. So on to the
ebay I went and placed my bid for the Pioneer NAV-SYS900DVD. It was a "Buy
it now" bid, so I got it and waited for it to arrive.
Installation
While
waiting for the unit to arrive, I started to research the installation
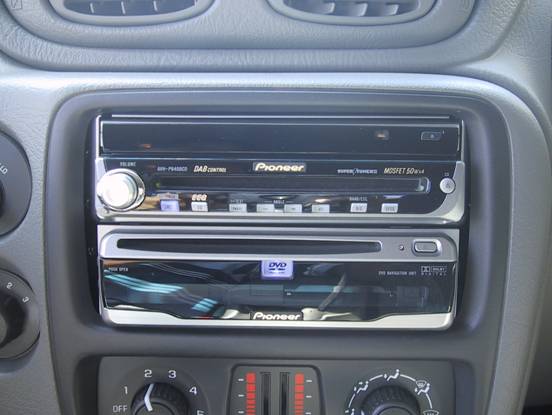
of the unit. Before making the decision to purchase it, I knew that the
Pioneer unit consisted of 2 DIN units; the AVH-P6400CDwith
its motorized head. This unit can also play CDs; and the AVIC-90DVD
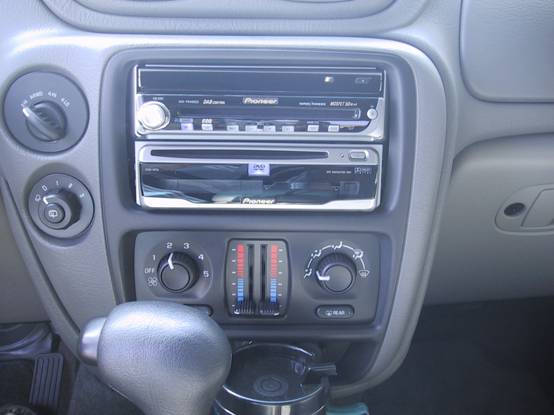
navigation unit and DVD player. I measured the opening of the dash for
the current radio and it was a double DIN radio. I was convinced that both
units could fit into the dash in place of the current radio/CD player.
I went to a few installers in my area to ask them to do the installation.
They would do it, but they all told me that only one DIN unit would fit
in the slot (the AVH-P6400CD). They will have to mount the AVID-90DVD remotely.
I was not convinced. That helped me to make up my mind. I would do the
installation myself. It should be noted that once the AVID-90DVD is plugged
into the AVH-P6400CD, the 2 units behaved like one. They were fully integrated.
I have the service manual for the Trailblazer. I had previously installed a remote start/security system myself. The installation could not be very difficult. Just remove the original radio, install the new unit using an adapter cable, and connect a few other wires:
·One wire to the VSS (Vehicle Speed Sensor for speed information)
-
One
wire to the backup light
-
One
wire to the emergency brake switch
-
One
wire to the Accessory ON power
On Saturday morning I turned my attention to the harnesses. What a nightmare. I took the 3 harnesses (one to relocate the original radio, one for the Head Unit and one for the navigation unit) and laid them out on a workbench. I then proceeded to splice, join, solder, install heat shrink tubing, tape, cut, etc. The end result was a custom cable that had four connectors and a few additional wires. One connector would plug into the original connector for the radio, one to the head unit, one to the navigation unit and one to the original radio in the back of the SUV. There were four additional wires that had to be installed as described above. I also had to install the GPS sensor and the microphone to the navigation unit, and a cable that connects the 2 units together. This was a very long cable (to allow the navigation unit to be mounted remotely) that couldnt be cut. So I had to find a place under the dash to store the cable. Running and storing the cables was the most difficult part of the installation. I soldered and used heat shrink tubing on all the connections. Another 4 hours of work (which includes building the harness and installing it) and I had the units installed and all the wiring completed. I re-installed the dashboard that I had removed.

Safety
first
As I mentioned above, one of the wires had to be connected to the emergency brake switch. The reason for this is safety. There are some functions that are not available unless the emergency brake is set. This is to prevent you from trying to set a route while the vehicle is in motion. Also, if playing a DVD, the monitor on the head unit will not display the video unless the emergency brake is set. This is to prevent the driver from the distraction. If a remote screen is attached to the unit, it will display the movie while the vehicle is in motion. Pioneer uses a fairly simple mechanism to enforce this. Set the parking brake and everything works. Or, if you connect the wire that is supposed to go to the parking brake switch to ground, all the functions work. Basically, the unit looks for a ground on this wire to allow full functionality. You make the decision on how to use this wire.
The
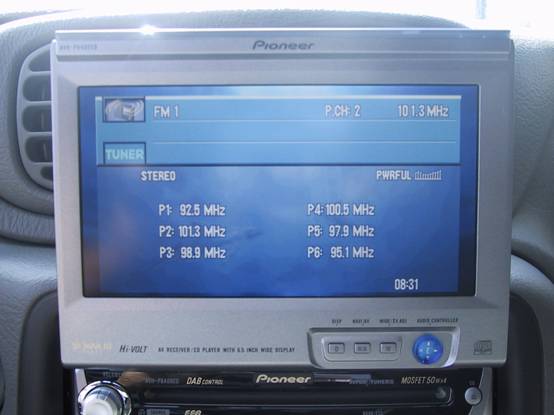
Radio and CD Player (AVH-P6400CD)
After the installation, I backed the vehicle out of the garage unto the driveway (to allow it to see the GPS satellites). I first played with the AM/FM radio and the CD player. Everything worked as expected. All the information for the radio and CD player are displayed on the screen, which looked gorgeous. The Cool Factor with this setup is enormous. Changing radio stations was fairly intuitive (using the switches on the unit or the remote or the microphone). And, the title and name of songs on the CD are displayed on the screen if the CD supports CD Text. Real cool!!! And everything can be controlled with the remote or by voice.
The
Navigation Unit (AVIC-90DVD)
I then started to explore the navigation system. I pressed the button for navigation and I was instructed to install the Navigation DVD. I did, and it installed the software, just like the manual said. After the installation was completed, the map was displayed with my exact location. I cycled through the different display screens that were available. There are four ways to display the navigation screen. I am sure that most people would find one of these screens to their liking. I took the SUV out for a test drive and the tracking information was displayed exactly right. The screen display was crisp and nice. And all the streets were displayed with their names. There were screens available to test all the connections (I had them all correct) and to check the 3D Hybrid sensor and the speed pulse (they were all working ok). In addition to using information from the satellites for tracking and position, the Pioneer unit has a 3D Hybrid sensor. It uses the speed pulse from the vehicle in addition to the information from this sensor to track and guide the vehicle.
Guidance
and Tracking
I decided to take my son out for a (very) late lunch. I search for a Point of Interest, and selected a restaurant from the Point of Interests database. Within 3 seconds, the map was displayed with 4 routes. I selected the one I wanted and decided to follow it exactly. It guided us correctly to the restaurant with early warnings and zoomed maps as appropriate. It was so easy to follow. Its voice guidance was great. Since the navigation system integrates with the radio so well, when spoken directions are given, it first mutes the radio, sounds a chime, gives the direction then un-mutes the radio. All this is done automatically. No chance of not hearing the directions that are given. On the way back, I decided to not follow its direction. Within 5 seconds of going off-route, it had re-calculated new directions. This thing is impressive. (It had better be impressive for $2000). I have been using this system now for a full week and I continue to be impressed with its capabilities. All of the tracking and routing can be initiated with either the remote or by voice. With the microphone mounted just above the steering wheel, the voice recognition was quite good. The microphone can be used to perform most (all?) of the functions that are supported by this unit, whether it is to play the radio, CD, DVD or navigation.
Even
in a Parking Garage and Tunnel
One day this week I had to visit someone in the hospital. Of course it told me how to get there. (I feel like I should give it a name, a female name because I set up the voice to be female). I had to park in a multi-level parking garage. It was kind of weird to see it still tracking correctly in the parking garage using its internal sensors. And it was tracking accurately. It was the same as I was driving through a tunnel. My turns and location were displayed correctly. Very nice.
Map
Features
I
said above that after I installed the navigation software, my position
was displayed correctly on the map. After looking at the Navtech
website, it turns out that the area that I live in does not have detailed
coverage. Most metropolitan areas in the
Playing
DVDs
Of course, one of the reasons that I select this unit was its ability to play DVD. And it does an excellent job at this. The picture looks crisp. And the display can be seen from all the seats in this SUV. I may add screens in the headrest one day. Of course, you cannot play DVDs on the main screen unless the parking brake is on (or a ground is sensed on the wire that is supposed to be connected to the parking brake switch).
Un-resolved
issues
I do have one un-resolved issue with this setup. The navigation system consists of two individual units and I think each unit has their own clocks. After I installed the Navigation software I was prompted to set the clock. The default clock is PST. I set it for PST -3 hours and set the DST. This displayed the local time (EST) when the Navigation system is in use. However, if I do not have the navigation DVD in the drive, and I am listening to radio or CD, the time that is displayed is PST, not my local time. As soon as I insert the navigation DVD, the time is displayed correctly. I have called Pioneer support on this twice and they were not able to help me with this. They told me to talk to my local dealer, but they dont have a clue what I am talking about. So if I do not have the navigation DVD in the drive, I am not able to display the time correctly.
Wishful
Thinking
There are some features on GM radios that I have gotten accustomed to that are not present in this setup. One of the features that GM has is the ability to control the volume of the radio based on the speed of the vehicle. If I set the volume of the radio or CD player while I am stopped, as I increase speed, the volume increases so that I do not need to change the volume to compensate for engine or wind noise. When I slow down, the volume decreases. I have gotten used to this feature. With the Pioneer unit, I have to increase the volume as I increase speed. The next time I start the vehicle, the volume is too loud, so I have to turn it down and then turn it back up as I start to drive. Since there is a microphone attached to the Pioneer unit, it should be relatively easy to implement this feature. I wish that they had done this.
The other feature that the GM radio has is the RDS system. While traveling, we were able to get weather and traffic information from stations that broadcast this information. The Pioneer unit does not support RDS. This is the ideal unit to support this feature because the RDS information can easily be displayed on the screen. I will miss that.
I would like to see Pioneer make a GM OEM replacement unit with this combination. Since the GM radios are double DIN, it would be easy for Pioneer to package the two units together into a GM form factor and create a direct replacement for GM vehicles. They would have to provide the Serial Communication link to the on-board computer like GM does on their radios. But if they do that, then the unit can monitor the computer traffic on the car and display all the information on the screen. There would be no need for additional wires because all the connections that have to be made on the current unit are available on the GM Serial Data Bus. So this dream unit would be able to play CD, radio, DVDs, provide navigation and become the interface to the GM computer system. All in a direct replacement unit. That would be cool.
Overall
Reaction
So far I am very happy with the Pioneer unit. It is what I expected it to be, and more. It provides all the information I need and it is relatively easy to install. I do wish, however, that someone could help me figure out the clock problem. It is embarrassing to have a $2000 unit that cannot tell time correctly. Other than that one problem, the unit has surpassed my expectations. I would highly recommend it.
Comments?
Corrections? Questions?
Email to
Daniel
Mohabir
Click HERE to Return to Joe and Jack's GPS Information Website