and MAPSOURCE FISHING HOT SPOTS
March 10, 2001 Release 1
Revised April 22, 2001 Release 2
Revised December 6, 2001 Release 3
On November 30, 2001 the software
for the GPSMap 162 was upgraded to version 3.03. See the addendum
at the end of this review for the changes.
GENERAL DESCRIPTION
This
unit will NOT accept the Garmin G-Charts, detailed navigation charts for
off-shore or inland waterways.
FEATURES
AND CAPABILITIES
The
GPSMap 162 is designed to operate from the boat electrical system (10
40 VDC), but comes with a wiring harness containing the G-162 fuse on one
end and a fuse and unterminated wires on the other. An optional 120VAC
power supply with com port adapter, and connector for the GPS is also available.
This AC adapter is convenient when setting up the unit with downloadable
maps from a desktop PC, although the standard boat power cable also includes
the wires that can be used to connect to a laptop PC in the boat with the
addition of a suitable DE9 connector.
The
GPSMap 162 kit has an external amplified antenna that is about the size
of a baseball with a 30 ft. cable that connects to the back of the unit.
This is usually long enough for most applications, but extension cables
are available. The unit is also available in an internal antenna
model. The external antenna model can be easily converted to an internal
antenna with an optional bail mount that replaces the mount on the back
of the unit. The new mount plugs in to the antenna connection when
it is attached, so there is no wiring required. The G-162 antenna
port provides power for standard Garmin amplified GPS antennas and it also
works with standard unamplified GPS antennas on a short extension cable.
This
unit is WAAS compatible after loading S/W ver. 2.60 which gives results
similar to connecting a DGPS receiver to the unit for increased accuracy.
"In the clear" static accuracy in one series of tests in Georgia provided
the data shown HERE.
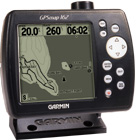
The GPSMap 162 comes in a black case about 6 inches wide and about 4 ¾
inches high. A cover is provided for the display when not in use.
The display screen is approximately 3 ½ inches square. The
controls include a CURSOR MOVEMENT button, ZOOM OUT, ZOOM IN, PAGE, QUIT,
ENTER/MARK, MENU, NAV/MOB, and POWER/LIGHT. The use of these buttons
is described later. It has a swivel bracket for surface mounting
or can be flush mounted into a panel or the boat's console.
It
has five screen displays, called pages, that are used for navigation.
The pages are sequenced forward or backward by using the PAGE and QUIT
keys. A feature on the Main Menu allows the user to delete any of
these pages from the normal viewing sequence if he seldom uses them.
The following descriptions of the pages are as they appear in the default
view. The pages can be tailored to your personal preferences, with no data,
perhaps 1, 2, or 3 lines of data, small, medium, large, and sometimes huge
print, data type, and position on the page.
1.
The Status Page (or GPS Page) is where the unit starts while acquiring
the satellites. This shows a sky view of the satellites positions,
vertical bars showing the status of up to 12 satellites: no data, located
and obtaining data, or locked in and ready for use. The page has
data cells giving the date and time, estimated accuracy, DOP, DGPS status,
and geographic location. When 3 satellites are locked in, the unit
establishes the location in 2D navigation and switches to the Map Page.
Data from a fourth satellite puts it in the 3D mode which includes altitude.
With WAAS enabled the status bars will include the letter D to indicate
that the signal from that satellite is being corrected.

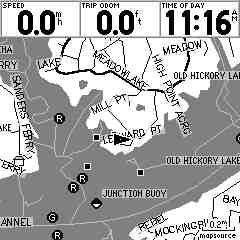
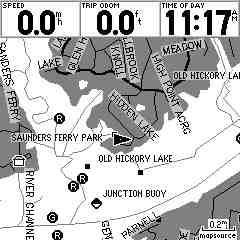
2.
The Map Page is just that: It shows the map with the present location in
the center indicated by a small arrow which points in the direction of
travel when moving. The map orientation can be changed so that the
route is up, or the track is up. The scale may be changed by using
the Zoom In or Zoom Out buttons from ½ inch = 800 miles (The whole
US, Canada and part of South America) to ½ inch = 120 ft.
The page has data cells showing the speed, distance to the next destination,
and an arrow indicating the direction to steer to get on course.
The map shows waypoints, tracks, routes, and any details that are included
on the map currently in use for that area. The map shading can be
changed from water mode to land mode which reverses the colors (black,
white, and shades of gray) to improve visibility of the map.
Land Mode
Water Mode
3.
The Compass Page has a compass with an arrow in the center. The orientation
of the compass has the current heading at the top, and the arrow points
in the direction to steer to the next destination. The arrow is not
present if the unit is not in the navigating mode. The page has 3
data cells which show speed, distance to next destination, and time to
next destination. It also has a text bar Navigating to: Next Destination.
4.
When in the navigation mode, the Highway Page is a graphical representation
of an artificial highway starting at the bottom and extending up, disappearing
into the distance. The waypoints appear on this highway and the highway
turns to join them together. The present location is the bottom of
the page. The scale of the page can be changed to see more or fewer
waypoints, or for clarification depending on the distance between waypoints.
There are 6 data cells giving speed, distance to next destination, direction
to steer to the next destination, distance off course (track), time to
next destination, and current track. It also has a text bar Navigating
to: Next Destination.

5.
The Active Route Page is a text page that shows the name of the active
route being followed, along with the waypoints on that route. It
shows the distance from the present position to each of the waypoints and
the course to steer between each waypoint. These are constantly updated
as the boat moves.
A
simulator mode allows you to follow a route and view the pages as they
would appear in actual navigation. In the Highway Page you can steer
the boat and change speed. You can sequence through the pages
to see the results when you navigate, get off course or miss a waypoint.
The
variable backlighting and contrast features ensure that it is easy to see
in any kind of light. These are controlled with a momentary press
of the POWER/LIGHT button and CURSOR MOVEMENT rocker switch.
The
NAV/MOB button brings up a menu that allows selection of the type of navigation,
and then the destination for navigation. Pressing this button twice,
then ENTER/MARK creates a waypoint named MOB (Man Overboard) and sets up
navigation to that point.
The
ENTER/MARK button is used to select an item on a menu, and also set a new
waypoint on the map.
The
MENU button will bring up a menu on each page that allows the page to be
re-configured or perform other tasks relevant to that page. Pressing
the MENU button twice brings up the Main Menu. This is where the
waypoints and routes can be developed and edited, trip data can be reset,
time format and zone can be established, and pages can be turned on or
off. Here the orientation of the Map Page can be changed, along with
the size of the text and details on the map, and the various downloaded
maps in memory can be turned off and on as well as the internal base map.
The
map page includes an accuracy circle around the pointer, the radius of
which is based on EPE, DOP, and map quality. Even with all
the possible errors, your actual position will supposedly be somewhere
in this circle. The circle can be turned off in the Main Menu, but
in close locations it will allow you to make adjustments to your position
to make sure you are in a safe area.
There
is a tide page included in the Main Menu showing the times and heights
of the tide, both graphically and in printed values. The date can
be changed to allow viewing of tides on future dates. (See addendum
at the end of this review for changes in the tide feature of the unit.)
A celestial page shows the relative position of the moon and sun from your
location, phase of the moon, time of sunrise, sunset, moonrise, and moonset.
Again, the date can be changed to get a future days information, and the
location can be changed to get data for that location.
There
are a number of audible alarms that can be set, turned on and off.
The unit can be used as an ordinary alarm clock, if desired. There
is an off course alarm that will keep you on your route. An anchor
drag alarm can be set for a distance change of 0.01 to 10.00 miles, and
will sound if the boat drifts that far from its original location.
An arrival alarm can be set to sound when you either reach a pre-set distance,
or a pre-set time from your destination, based on your current speed.
The
GPSMap 162 will store up to 500 waypoints and 20 routes of 30 waypoints
each. The routes can be reversed as needed. The waypoint names
can be up to 10 alphanumeric characters which makes them easily recognizable.
They can be identified by any one of 38 icons which is then placed on the
map. The unit records the actual track of the boat and the TracBack
feature allows you to convert this into a route that will take you back
along the same track to your starting position.
The
Acquisition times posted in the manual are: warm start, 15 seconds, cold
start, 45 seconds, auto-locate, 5 minutes. This unit bettered
those specifications, with a warm start as low as 8 seconds, cold start
after a 2000 mile relocation as low as 17 seconds. Position accuracy
specification is 15 meters (49 ft.) and can be 1 to 5 meters (3 to
15 ft.) with an optional DGPS receiver. With WAAS enabled the unit
showed an accuracy as low as 2 meters (about 6 ft.). See sample
of position measurements made at a fixed location and out in the clear
away from trees, etc. HERE.
The
MapSource program is run on a PC with a CD-ROM drive. Using the available
maps from Garmin you can see details of the area selected, create waypoints
and routes, measure distances, and find locations. These maps and
their associated features can then be loaded into the GPSMap 162.
The MapSource program is very easy to operate. It has a series of
icons on the tool bar that are enabled by clicking on them. They
include zoom in and zoom out, a zoom tool that will re-center the map and
zoom in on that point, a hand tool that lets you grab the map and move
it around on the screen, a selection tool that when pointed to an object
brings up a name and description of the object and is also used to select
items for deletion, a waypoint tool which creates a waypoint by clicking
anywhere on the map, a route tool that creates a route by clicking on waypoints
in sequence, map tool that can be used to locate the individual maps
in a map set and add or delete them from the set, and a distance and bearing
tool that is used to determine the distance between points on the map,
and get a bearing to follow. A text area with tabs lists the maps,
waypoints, routes, and tracks in memory. These can be selected for
editing and deleting and the map is then updated. With the GPS connected
to the computer serial port the map is downloaded with one click on the
download icon. Likewise maps (actually the names of map sections
that are recognized by MapSource to allow selection of the proper map from
the CDROM) can be uploaded from the GPS with one click of the upload
icon.
The
Fishing Hot Spots map of Old Hickory Lake shows the navigation lights,
marinas, boat ramps, and roads near the water. The details of the
water area include channel markers and buoys, river mile markers, bottom
contour lines, water depth, submerged roads and structures, and of course,
the "hot" fishing areas. The old river bed and tributary stream beds
are marked so that you can follow the deepest channels to a location.
The navigation markers are actually red and green, but being a black and
white screen, the map shows them as G or R to indicate color. The
fishing spots are shaded areas and indicate the areas most likely to have
good fishing. By moving the cursor in the Map Page over an item marked
on the map and pressing enter you can see a narrative about that item.
For instance, selecting the river bed will tell the name of the lake, how
big, how deep, when it was formed, general information about it, and its
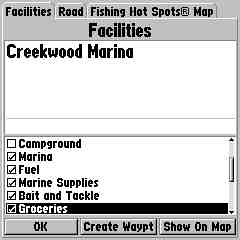
history. Selecting a park will list the facilities available such
as water, boat ramp, groceries, fuel, and many other things. Selecting
a marina will list the facilities available there. Selecting a fishing
area will tell the best seasons, type of fish, water temperature at certain
times of the year, and other fishing information.

USE
OF THE GPS-162
Although
the MapSource CD contains many maps, an unlock code must be entered to
view the several map regions. Installing the MapSource CD with the
GPS connected to the serial port will allow you to update the GPS software
if necessary. MapSource then instructs you how to access the
Garmin Web Site, and using a code that came with the disk and the GPS serial
number, you will receive an unlock code. Entering that code into
the MapSource program then brings up the detailed map. I then created
a number of waypoints. With the waypoint tool enabled in the program,
it is easy to point to a spot on the map, click, fill in the information
box if necessary (default names are already given, but may be changed),
click OK and go to the next spot. Enabling the route tool lets you
simply click each waypoint in sequence and you have a route. This
could be done on the GPS, but takes considerably longer.
I
then downloaded the map into the GPS. This is a simple one click
on the download tool. Everything else is set up by the program.
I could now view the Fishing Hot Spots map, which also included my waypoints
and route that I had created with the MapSource program. The GPSMap
162 has 2.5 MB of memory for map storage. I eventually loaded 4 Fishing
Hot Spot maps into it and used only 1.3 MB. It obviously has plenty
of map storage space for any of the Fishing Hot Spots maps you may need.
In this case none of the maps overlapped each other, but if they did, each
individual map can be turned on or off. Note: While the CDROM's
name is "Fishing Hot Spots", it included much additional information
such as: navigation buoys, lights, dam locations, depth
contours, roads, marinas, parks and launching ramps around the waterways.
Installing
the GPSMap 162 on the boat should be no problem for the typical boat owner
who is always installing radios, depth finders, stereo systems, and the
like. In fact, this has fewer connections than many other items I
have installed. The unit was installed on a 37 ft. houseboat at the
lower helm station. A second station connection will be installed
later on the flying bridge. The antenna cable was routed through
an existing cable tunnel to the upper deck and the antenna was mounted
on the flying bridge structure. Although there is a Bimini top on
the bridge, it does not seem to interfere with the reception.
The
Base map and the Fishing Hot Spots map can be turned on or off for the
display. Using only the base map we were quite often over dry land
according to the GPS. A warning message at the GPS startup states
that the map is to be used as a reference only, and I found this to be
quite true. The river is about a mile wide here and narrows down
as it goes upstream. I would guess that we would be shown on land
the majority of the time as we got further upstream. Enabling the
Fishing Hot Spots map made a world of difference. It appeared to
be quite accurate as we followed the shoreline.
Although
I am not an avid fisherman, I checked with some of my friends who are and
they seemed to be in general agreement that the fishing areas on the map
were some of the best places to catch fish. Of course, they each
had their favorite spot which didn't coincide with anybody else's.
Using this map should increase your chances for a successful outing.
The
locations of the navigation aids on the Fishing Hot Spots map were compared
to the official river charts published by the U. S. Army Corps of Engineers
instead of to their actual location. They were found to be quite
accurate and within 100 ft. or less of that shown on the charts.
When the channel buoys are pulled up for maintenance they are not always
put back in the same spot, so comparing the Fishing Hot Spots map to the
actual location would not be fair. One buoy near here has moved up
and down the channel over a half mile in the last 20 years.
All
the marinas, parks and launching ramps are shown their correct locations,
and the roads and streets near the lake are all properly named. I
have used other maps where this is not always true and is sometimes difficult
to find a location. The Fishing Hot Spots map showed a launch ramp
that I had not noticed before, but it was there in the right location.
Being able to move the cursor to a marina or park and pressing ENTER to
find out the facilities available is very convenient and informative.
By
following the old stream beds and roads that are shown on the Fishing Hot
Spots map, I was able to go back into bays and tributaries. The lake
is muddy and visibility in the water is nil, so knowing which side of the
mouth of a bay has deep water is very important. Using a depth finder
along with the Fishing Hot Spots map indicated similar water depths, although
silt has filled in some areas of the lake in the 40 some years it has been
here.
SUMMARY
I
have enjoyed using the GPSMap 162 and the Fishing Hot Spots map, especially
when navigating in unfamiliar water at night. Even though the shorelines
were over a mile apart, only about a 500 ft. width was deep enough to travel
in, and that wiggled back and forth like a snake. I came through
with no warning sounds out of the depth finder. Even in broad daylight
in a river it is easy to get distracted and wander out of the channel.
Setting up a route beforehand and setting the OFF COURSE alarm will keep
this from happening.
The
only drawback I can find is that the GPSMap 162 has so many features that
it is hard to remember them. However they are logically placed in
the Menu and pushing a few buttons will refresh the memory.
(Note
that WAAS may not be satisfactory everywhere and there is nothing that
can be done until the FAA gets more WAAS satellites available.)
ADDENDUM
On
November 30, 2001 The Software was upgraded to version 3.03. This
corrected a few minor faults and modified some of the features to improve
them and/or be consistent with other Garmin marine products. It added
support for the BlueChart Cartography which is now available on MapSource
CD-ROM. The "Go to Point" operation in navigation was changed to
include a Find interface that improves finding a type of place, such as
a waypoint, rest area, Interstate exit, etc. If an Interstate exit
is selected it will show the services available there. Of course
the points found depend upon the detail of the particular map loaded into
memory.
The
major change in the software was the manner in which the tide data information
is stored. Previously the tide data was included with the basic software
and downloading version 3.03 eliminates that data. It is now stored
in the area of memory where the maps are stored. You have two options
for restoring the data: 1) You can download the original data and
load it into the memory, but any user loaded maps are erased. Likewise,
loading maps then erases the tide data. 2) The preferable way is
to use MapSource compatible tide maps. If you have a MapSource program
that does not include tide data, you download a MapSource version
of the tide data maps, execute the program, and the tide maps become available
in the MapSource program. There are three maps that cover the U.S.,
including Alaska and Hawaii, Canada, and Mexico. Selecting all three
only takes up 162 Kb of memory out of the 2.5 Mb of map memory available,
leaving plenty of space for maps. Of course, maps from various MapSource
products can be combined, as long as the total stays within the 2.5 Mb
limitation.
The
tide maps can now be used like any other user loaded map and can be turned
off or on as desired. When used by themselves, they will show all
the tide stations available, of which there are hundreds. You can
get the tide data for any one of them by panning to it and pressing the
Menu key. The tide tab on the main menu lets you select the tide
stations nearest you, or nearest another location that you can select from
the map. The date can be changed to show tide data for the future
or past.
You
can get the new software, the tide data and MapSource tide maps, plus full
instructions AT NO CHARGE by going to www.garmin.com
and selecting Support, then Software Updates, then GPSMap 162 (or www.garmin.com/products/gpsmap162/agree.html
) agreeing to the terms, and following the instructions on the page.
click here to email Richard Wilson <rwilsontn@comcast.net>
Click HERE> to go Back to Jack and Joe's GPS Information website