Magellan eXplorist 210/500/600/XL Small Geocaching
Units, Review
For specific questions about this product, log onto the GPSInformation.net
FORUM
Return
to home page * Text by jack
yeazel and max bramel
(1 Feb. 2006 -Add eXplorist
XL)
(27 Dec. 2006 -Add Video
and text instructions to upload DirectRoute maps)
(3 Mar. 2007 -Add
additional Information about the copy protection on the new Magellan maps)
 .....
..... .....
..... .....
.....
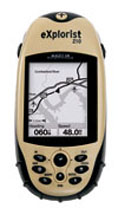
eXplorist 210, 500, and
600
-and explorer Max
GENERAL:
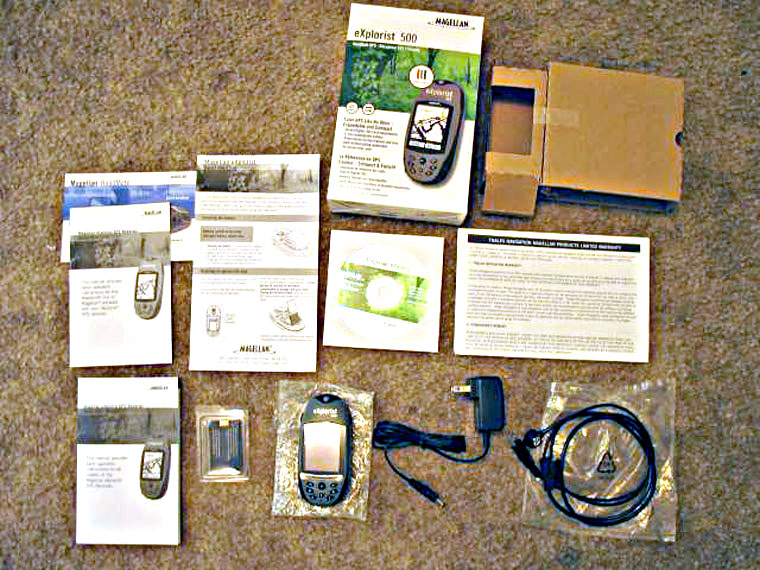
The eXplorist 210/500/600, check for latest discount prices (HERE),
are about the size of a Garmin Vista/Legend-C and have the same size screen
(16 Color Transflective for the 500 and 600 which have a very bright backlight)
and USB connections. See the 500 package contents (HERE).
The eXplorist 210 has a black and white screen with a red backlight and
22 MB of built-in map memory plus a basemap. We upgraded the 600 Firmware
from 1.61 to 2.03 -which causes the unit to report its version as "5.203".
The screens are as wide, but not as tall as the SporTraks.
The 600 adds a thermometer, barometer, and (most important for geocaching),
a 3-axis compass. The 400 is black and white, and interestingly,
the 300 has a 2-axis compass. The 100/200/300 lack computer connectivity,
so one is limited to the loaded basemaps (the 100 has no map at all).
The units have patch antennas (more sensitive in the horizontal position)
as opposed to the previous Meridians and SporTraks' helix antennas.
The horizontal position is actually better suited for searching for geocaches.
There are only four Nav screens, but we've not seen any lack
of needed screen information. However, some will miss the opportunity
for additional data field display.
When you connect the 210/400/500/600/XL by USB cable, it sets itself
up as another drive on the PC. The unit will ask you whether you
want to exchange data with Internal or SD Card memory (for those units
with SD cards). The Conversion Manager software is needed to upload
multiple maps. (There's not actually any conversion going on, just
a USB 1.1 transfer.) Internal Memory will hold Waypoints, Routes,
POIs, Tracks, and (small) Detail maps. Most of the time one would
probably select External memory. Otherwise, select Power Only to
enable you to work with the unit without draining the battery.
The eXplorists support area (and perimeter) calculations based on
My Points of Interest, Geocache Points, and points selected from the background
or detailed maps. They no not have an external antenna capability.
The connecting cable is reversible where it mounts to the back of
the GPS. It should be connected with the cable running down the length
of the explorist. The eXplorist is watertight - sealed to IPX-7 specifications.
eXplorist
XL SUPPLEMENT:
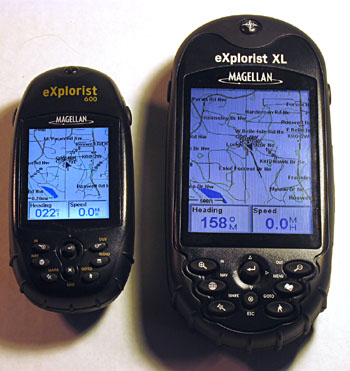
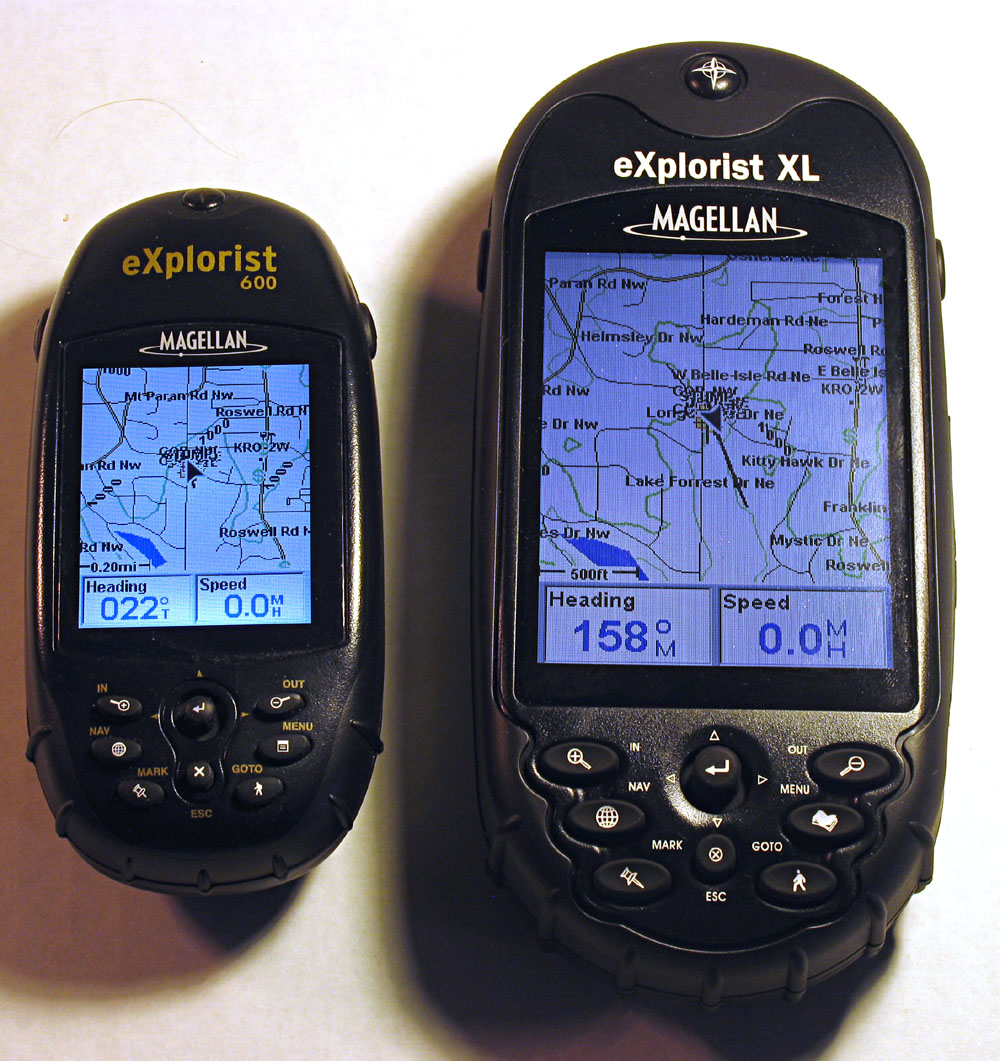
eXplorist 600 as Compared to the eXplorist
XL
This unit, about $370 check prices (HERE),
has the same operating system as the smaller eXplorists and is essentially
a larger version of the eXplorist 500. It has a large and very readable
3.5" (diagonal) 320 x 240 display as compared to the eXplorist's
2.2" 220 x 176 display. The XL display is not as bright as the 600.
Although the unit doesn't come with an SD card, it has 65MB of memory,
30MB that can be devoted to maps and data, which should be sufficient for
most purposes. The SD slot is much more convenient than those of
the eXplorists, which is behind a battery that has to be removed.
This unit doesn't have an electronic compass, (as with the 600) nor
a rechargeable battery, as with the other eXplorists. The unit is
powered by four AA batteries. One other thing that's lacking as compared
to the 600, it doesn't come with a power module to operate the unit at
your computer. However a similar USB cable with a jack midway IS
supplied that will accept the eXplorist 600's power module cable to power
it without batteries.
INTERFACE:
One of the first things you will notice is that the user interface
is like no previous Magellan hand-held. Activating the unit's USB
File Transfer mode causes a virtual hard drive to appear in Windows Explorer's
drive list. In this "drive" are the folders in the unit's Memory
or SD card (if you purchase one separately) depending on which Transfer
Mode you select. It doesn't appear that a USB card reader is necessary.
The folders are: Background Maps (basemaps), Detail Maps, Geocaches,
My POIs (waypoints), Routes, and Track Logs.
Like the Meridian, there is 16MB internal memory in the 500/600,
but half that is taken up by the basemap. Much of the remaining space
can hold a [relatively small] Detail or Basemap. The downside of
this is a map too large, locking up the unit and being hard to delete.
Where previous interfaces are (more or less) self-evident, the eXplorist
requires that you read EVERY WORD of the instructions! We'll try
here to get you over the "humps" that stumped US for awhile.
SETUP:
The setup CD contains the USB driver and manual. Also included
are the Conversion Manager for uploading
waypoints (now called Personal POIs) and MapSend maps. A fourth program,
Geocache
Manager, is used to upload Geocache .gpx files to the Geocache
directory in the Memory or the SD card. You should install all these
programs.
USER INTERFACE:
The eXplorist interface is much like Windows Explorer, in that you
use a "directory structure" to store or look for data. In the unit,
"Up One Level" is the same as the the "Up" folder in Windows. By
going Up One Level, you will eventually come to the "Root" of the unit
where you can access either the Internal Memory or the SD Card. Some
might want to store waypoints and geocaches in Internal Memory and maps
on the SD Card, for example.
If one doesn't see a file that was loaded into a folder, it may be
that one is looking in internal memory rather than SD memory (or vice versa),
as the same file tree is created by default in both locations. It
is recommended to add any user-specific folders to or within the default
folders provided, as the unit will re-create any default folders deleted
by the user. Files can be copied, moved, or deleted from within the
unit.
UPLOADING MAPS:
"rws" from the Groundspeak Forum has prepared two .wmv vidios and
a text file to aid in the procedure of creating and uploading MapSend DirectRoute
v. 3.0 maps to an eXplorist. Download (THIS)
zip file to extract the vidios and read the text.
We have three maps to experiment with, Topo
3D USA 1.00, DirectRoute,
and WorldWide Basemap.
Topo 3D USA uploaded without modification, but WorldWide Basemap 1.00d
needed to be updated to version 1.30 (HERE).
NOTE: Uploading a WorldWide Basemap will prevent any contours
from a Topo 3D USA map from displaying.
COPY
PROTECTION:
MapSend Topo 3D USA 1.00 (which comes on CD) is licensed for use
with one Magellan GPS receiver, although the program allows up to three
changes to the original serial number entry. However, the new Topo
3D USA v1.5 (on DVD) will allow uploading maps to only one receiver: the
program requires an unlock code associated with the GPS serial number.
The program and its unlock code can be loaded on multiple computers for
use with the same GPS. However, if you have a SECOND receiver bundled
with the new Topo 3D USA requiring a second unlock code, you will need
a second PC Computer to install the maps in order to upload them to the
second unit--a given computer can apparently handle only a single GPS serial
number.
DirectRoute's copy protection is similar: DirectRoute v1 and v2 were
sold on CD and allowed one to change serial numbers for up to 3 times (for
a total of 4 different units). DirectRoute v3 comes on DVD and requires
a dedicated GPS/computer pairing. Multiple MapSend programs (e.g.,
Topo3D and DirectRoute) can operate with the same computer so long as the
unlock codes are for the same GPS.
The Procedure:
In MapSend:
Mark the Regions you wish to upload. Select Regions -Upload
to GPS -Save on Hard Drive. The serial number apparently tells MapSend
whether to save (Detail) maps as *.imi files, needed by the Conversion
Manager, instead of *.img files, needed for serial uploads. And WorldWide
Basemaps apparently create *.mgi files for (Background) maps instead of
*.img files for serial transfers.
In the Unit Select:
Menu, Advanced Features, Communications -choose File Transfer -Select
SD Card. (Normally the Internal Memory is too small for maps).
A USB 2.0 reader (would) allow for faster file transfer, so
it might be worthwhile for someone setting up their card for the
first time. But it's more of a hassle to get the card out
of the eXplorist than the Meridian, so we leave it in all the time.
The SD card is installed behind the battery.
Conversion Manager:
Select: Transfer Map Regions -Next -Next -The program then looks
for *.imi (Region Image files). It possibly doesn't find any, if
you have several types of MapSend maps. (If not, click on the folder
icon and navigate to the [Mapname]\Export\Images folder of the desired
map.) Select the maps you want to upload and press Next.
Then in the unit:
Change to the Power Only mode, select -Preferences -Active Setup
-Detail Maps, Select Map, -and choose a map from the list to make Active.
If you have converted a basemap, you can make it active under Background
Maps.
NOTE: There is a procedure that does NOT require the Conversion Manager,
however it only allows one map at a time to be uploaded. With the
unit in the File Transfer mode, select the Region of interest, Upload to
GPS, Upload to SD Card Programmer. (The unit will then look like
a card reader). The uploaded file will be named "detail00" and will
be in the "root" folder and NOT in the "Detail Maps" folder.
DirectRoute:
Use of MapSend DirectRoute software on the Explorist is virtually
identical to the implementation on the SporTrak Color, Pro, and Pro Marine,
Meridian Color, Platinum, Gold, and Marine (HERE).
A few of the bugs with DirectRoute on the SporTrak/Meridians have been
addressed. Settings are restored after an autoroute even if the unit
is turned off before the route is completed (on the Meridian, user settings
were not reset under such conditions). There is more consistency
in hitting keys to shut the alarm off during autorouting: the first press
of any key always activates the backlight (if not already activated), and
a subsequent push of the ESC key silences the approach alarm without activating
anything else
that one would have to escape from (as usual with the Meridians).
Any key silences the arrival alarm without other effect.
DirectRoute on the eXplorist:
It's really just like using the Meridian except for some very slight
differences with the Meridian's menu structure.
 ..
.. ..
.. ..
..
In this sequence of pictures with DirectRoute, the Explorist has been
asked to GOTO/StreetRoute. Once the route is calculated, the display
presents a track-up orientation at .20 mi zoom level, although the user
can then change zoom, orientation, alarm, or other settings to whatever
is wished (if different route settings are preferred, however, it is necessary
to change them with every autoroute created). The calculated route
is highlighted in green.
The next turn is displayed at the bottom of the screen, exemplified
by the screen displaying .16 mi away. As one arrives at the turn,
a large display of the turn maneuver and the new street displays for two
to three seconds, and then the screen zooms to 250 ft until the turn is
completed. At that point, the next turn and distance to it displays
at the bottom, while the zoom level reverts to the setting prior to the
previous turn process.
The right-hand distance notation is the distance to the final destination.
This distance is not based upon the actual road mileage, but equals the
sum of a point-to-point "as the crow flies" summation of the straight-line
distances to each intermediary waypoint in the route. It is thus
apt to be an underestimate of the total distance to go, and windier roads
will increase the degree of underestimation. (The Garmin auto-routing distance
calculations include the actual distance on the roads.) The fourth
frame shows that after zooming out past 0.40mi, the unit does not "rubber-band"
to any of the roads.
Geocache Manager:
Select the gpx files of interest. The Manager allows you edit
individual caches. Activate the unit in the File Transfer mode, select
either the Internal Memory or SD Card, and Export the (*.gs) files to the
GPS. Then in the unit, change to the Power Only mode, select -Preferences
-Active Setup -(Navigate to the Internal Memory or SD Card depending on
where the caches are stored) -Geocaches -and then select a file of interest.
While Geocache POIs are a step forward in making useful geocache
data easily accessible on the GPS, the current implementation suffers from
several shortcomings. Geocache POIs, unlike regular POIs, cannot
be edited or deleted on the GPS. The Explorist will only accept 200
POIs per file, but no warning is offered that excess data is being lost.
There is no field for description of the geocache, and only the first 50
characters of any hints provided are displayed. It would also be
desirable if there was a way to directly access the Geocache POI data screen
directly from the compass screen (the most likely screen to be used for
a final approach of a geocache) while an active GOTO is set.
GEOCACHING:
The pathway for this internet data is as follows: get gpx files
(called pocket queries) emailed to you from geocaching.com based on search
criteria you define. Open the gpx file in Geocaching Manager or Geocaching
Swiss Army Knife (GSAK) -a program for managing an off-line database of
geocaches- and upload POIs to GPS. GPSBabel is also capable of sending
gpx
files to the unit. Geocaching.com will let you sign up for
1 month at a time for $3 per month.
GSAK:
Geocaching Swiss Army Knife is a waypoint management program focused
on the needs of geocachers. GSAK is nagware; all features are available
for use, but after a trial period reminders to register the program delay
program functioning. A full review will be published in the near
future, but a brief description is provided below. GSAK is available
at
http://gsak.net.
GPX format "pocket queries" from geocaching.com can allow the import
into GSAK of up to 500 cache waypoints per file. Once in GSAK, users
can track caches that they have found, not found, or placed. Detailed
cache information, such as the cache description, is easily accessible.
Users can sort or filter subsets on a wide range of criteria. GSAK
uses the power of
GPSBabel (http://www.gpsbabel.org/)
to upload waypoints to many GPS receivers and/or export to popular mapping
programs. Additionally, GSAK supports PDAs with html output and the
format for the popular CacheMate (http://www.smittyware.com/palm/cachemate/)
program for the Palm OS. Macro automation speeds repetitive tasks.
COMPASS:
This is an advanced 3-axis compass that can be used in the vertical,
tilted (but not rolled), or horizontal position. The compass can
be turned ON or OFF under Preferences -Power Management. The compass
is most useful while searching for geocaches. One can stand still
and have the compass needle point to the (GOTO) cache or waypoint.
ACCURACY:
In initial tests of the unit over a GPS base station marker, the
unit appeared to to be stable and within the advertised WAAS-enabled accuracy
of 3m 95% of the time. Using SA
Watch connected to the soft port (see below), I ran some more
extensive tests on my back deck under moderate tree cover (HERE).
BATTERY:
These units use a lithium removable rechargeable battery.
The battery can be recharged by the USB port (if the unit is off) or
with a wall-socket power module and a supplied three-way cable. The
battery charge indicator in on one of the Nav pages.
Rundown times tests on the 500: Backlight low: 16 hours 08 minutes,
Backlight medium: 13 hours 52 minutes, Backlight high: 7 hours 36 minutes.
These times were to the sounding of the low battery alarm. The unit
shut down about 15 minutes after the alarm sounded. Note that the
backlight is never completely off --this can be verified by viewing at
the lowest setting in the dark.
Battery Replacement:
Spare Li-Ion batteries are expected to be available from Magellan.
However, one of the extended use versions of the Li-Ion battery for the
Motorola T720 cell phone appears to be a match in nearly all characteristics.
(NOTE: there are several different mAH ratings available: the standard
T720 battery is thinner than the Magellan OEM battery, while the highest
capacity T720 battery is thicker; neither of these would fit properly.
The T720 battery with the same thickness as the OEM Magellan battery is
1100 mah, Part #SNN5595B. We've used a couple of the Motorola batteries
now and have used them successfully.
NMEA MOVING MAP with a 'SOFT' PORT:
First load a map.
With the unit in the Communications Mode, select: NMEA Data Comm,
V2.1 GSA.
Using a Topo 3D map:
Select Options, GPS settings, run Autodetect.
(On this computer, the program detected the unit as a soft port,
COM 4, at 4800 baud.)
Select GPS log, Start.
Generally speaking, each time you load the program and set the unit
to NMEA V2.1 GSA, the map will follow the GPS unit. (Sometimes we
had to plug the unit in AFTER the map was loaded.) Other times the
eXplorist will not transmit NMEA even if it's set that way and plugged
in.
HyperTerminal:
I suggest you plug in the eXplorist, set it to the NMEA mode, and
make sure it's sending NMEA to a MapSend map. Then configure a HyperTerminal
file to connect to the soft COM port (created above), at 4800 baud, 8,
N, 1, Flow Control -None. -and put a shortcut to it on your
desktop. This way you can tell if the eXplorist is actually sending
NMEA and save yourself a lot of frustration when it doesn't work.
I have tested the eXplorist NMEA (on the created soft COM port) successfully
with Ozi Explorer, Street Atlas, and even Garmin MapSource maps.
PERSONALIZE:
Allows one to enter their Name, Address, and Phone number.
Also one can customize Daylight Savings Time for different areas of the
world.
USER COMMENTS:
The main reason I bought the unit was a desire for a good color
display, and I am not disappointed on that count. The display is
crisp and bright with backlight on. It's rather dim without the backlight
unless under full sunshine, in which case it looks fine. Glare is
not a problem. The display is about 75% the size of the Meridians,
but the unit's overall size feels like half that of the Meridian .
The eXplorist easily slips into a pocket.
The unit rests comfortably in one hand and is reasonably operated
in the same manner. The buttons are close enough together that one's
digits usually are touching several buttons at once, but it's easy to press
one key at a time. The clickstick is the main interface tool; I liked
the Meridian rocker switches better as an interface, but the clickstick
is definitely the way to go for space efficiency. I'll get used to
it.
There are fewer features in the first release of the explorist firmware
relative to the Meridian. I expect that some things (e.g., waypoint
projection) will be added later. Currently there are only four screens
displayed. They happen to be the four I used on my platinum, so no
complaint from me there, but some miss the opportunity for additional data
field display.
I have been happy to discover that at least a few of the bugs with
DirectRoute are gone. In particular, settings are restored after
an autoroute even if the unit is turned off before the route is completed.
Also, I find more consistency in hitting keys to shut the alarm off during
autorouting: the first press always activates the backlight (if not already
activated), and the second push silences the alarm without activating anything
else that one would have to escape from (as I did with the Meridians).
Let me warn you of one glitch that has been inadvertently discovered
by more than one user: it's a good idea to limit your detail map file uploads
to the SD card, and avoid the internal memory. If the map file becomes
corrupted, it locks up the unit. It's easy to remove and delete the
file on the SD card using a reader, but with internal memory this option
is not available. A few people had to return their units when they
tried to force a load of the old MapSend Topo files to see if they would
work. Eventually someone discovered that a reset of the unit from
the secret menu (it appears to closely follow the Meridian firmware's structure
in many ways) could get it functioning again, but at the possible cost
of losing any other data stored only in internal memory.
All for now; we are happy to entertain any specific questions that
anyone has. A promising detailed report (still in the making) with
good photos can be found on the geocaching boards (HERE).
Good navigating and geocaching!
max
and jack