Reviewed by Jack Yeazel and Matthew Birch
(14 July 2002, Expand on Tide Tables)
(29 April 2004 -add Editing NMEA)
Click
HERE to see our REVIEW ADDENDA for the GPS-76S with Compass and Barometer
Click on thumbnail for additional information:
Click
HERE to see our REVIEW ADDENDA for the GPS-76S with Compass and Barometer
Click on thumbnail for additional information:
A good buy?
The GPSmap 76, $310US (check prices HERE),
is quite a lot of GPS for the money. What does it have going for
it? A larger screen than the eTrex series, (WAAS),
map or marine navaid capable, many customizable options, all buttons on
the front for easy access, and features not found on other Garmin units
(see below).
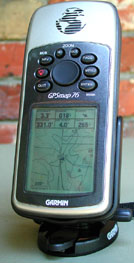
Overview:
The GPSmap 76 (Ver. 2.07) superficially
looks like an eMap with the same screen size and key layout above
the screen with a layout similar to the G-III+ with the keys lighted.
The screen is 180x240 pixels as compared to the eMap's 120x160 and the
G-III+'s 100x160. The unit is somewhat bulkier, weighing (with NiMH
batteries) 228g as compared to the eMap's 196g, but lighter
than the G-III+ 251g. However, the GPS does fit in a shirt
pocket. The unit is surprisingly light for how large it is; this
allows the unit to float.
Any drawbacks? The unit has only 8MB of map memory as compared to the Vista and GPSmap 76S's 24MB. The greenish-cast screen isn't as readable as the eMap or GPS-V. But if you are a G-III+ or G-12Map user, this is a good upgrade. You can load all of Garmin's map types. The unit does support the address look up and next-intersection features like the eMap.
A Marine Unit?
Yes, Garmin advertises it as a marine
GPS. It comes pre-loaded with a marine POI navaid database.
However, its 8MB of map memory can be used for any of Garmin's maps, including
MetroGuide. To get the POI files, go to: http://www.garmin.com/support/download_details.jsp?product=010-00249-00
(There
are two databases, Americas Marine and International Marine.) These
files will replace any map that may be stored in the unit. The navaid
database acts like a "map" in that any uploaded map erases the database.
In order to re-load either of the databases, just download the 2.22MB of
"Preloaded POI Database" program from Garmin's GPSmap 76 download section
and install it on your computer. Then download one (only) into
the GPS unit.
NOTE: These databases have no "Points of Interest" (as generally understood) and don't appear in the in the GPS Points of Interest list. Selecting: Setup Map, Point, will give access to Navaids control.
Marine Nav Aids:
 ..
.. ..
.. ..
..
Americas POI Navaids
USA Topo
Americas POI Navaids
USA Topo
Tide
Tables:
These tide tables are part if the GPSmap
76(S) and GPSmap 176C base maps. If you've ever run aground in your
sailboat and the tide is falling, you really need to know when the tide
will be back up to the same level or higher than it was when you hit bottom.
People pay good money for tide tables that may only cover a couple of tide
stations for 1 year only! Also the tide tables don't have graphs
like the GPSmap 76 has. With the 76, you can access any of over 3000
different locations (tide stations) in the US and check the tide for any
day in the future out to 7 years from now. (We guess they figure
you'll have a different GPS by then.) The 3000 tide stations cover
the USA coastline, Alaska, Hawaii, western Canada, and several of the Caribbean
Islands. This is unbelievably helpful. Also many fisherman
plan their trips exclusively based on when the high or low tide will be.
Selecting a tide table:
Go to MENU and select CELESTIAL, then
TIDES. You can set the receiver to display the closest station to
your position. After selecting TIDES, the Tides Page should come
up with a graph and times of high and low tides for a given station.
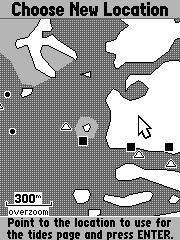
In order to use the map and cursor to find a tide station, you must highlight the NAME field for the tide station that is displayed. Then arrow down to the last entry (or if you're clever, just arrow up once!) which should be Use Map and hit enter. You will then see a map of the US load (painfully slowly I might add). Zoom in and pan to the location you are interested in and hit ENTER, or if you want your present location, just hit enter immediately. You should then get a list of the nearest tide stations (sorted by proximity) to the position the cursor was at the time you hit enter. Select the correct one and hit ENTER again, and you should have it.
. ......
 .......
 .....
.....
Charts used to select a location:
Marine POI (Navaids)
* BlueCharts
* MetroGuide
USA
 ........................
GPSmap 76(S) Tides Table
* MapTech's Offshore Navigator Tide Calculation
Here the tide table closest to the cursor is calculated by both the GPS unit and OffShore Navigator. As you can see, they are the same. The 'zero' line is Mean Low Level Water. Other units that have tide tables built in are the 152 and 196. The 162 and 168 must download the tide tables from Garmin's site. Although the GPS 76 and GPS 72 also contain tide-prediction tables, they cannot accept BlueCharts.
There is one large rubber foot across the top that hides the MCX antenna connection on the right side of the back and two small rubber feet near the bottom. The battery door starts just above the mid-line in the back and opens and closes like the eTrex series with a post that has a T-bar in the center of the cover that locks into the chassis. The batteries run horizontally left to right in the GPS unlike the eTrex that run vertically. The data port is in the center of the bottom half of the unit. It uses the same power/data connector that the G-III+, G-II+, and G-12XL series use. It uses a non-regulated cigarette lighter adapter the same as the G-III+ and G-12XL series (except the plain G-12). The battery door and data port cover are molded together and come completely off the unit. The lanyards attachment point is at the bottom center of the unit.
Sensitivity:
The GPSmap 76s helix antenna is a little
more sensitive to orientation than the G-III+ with its movable antenna.
The unit must be held vertically for best reception as compared to the
eSeries patch antennas which work best horizontally. There is a simple
and effective mount available to hold the unit vertically. The mount
base is common to the StreetPilot (ColorMap) and eMap mounts.
As far as signal reception, the GPSmap 76 does well. It has about
the same sensitivity as a G-III+ and slightly better than an eTrex.
Operation:
The unit requires (for the first lock
to a WAAS satellite) about 30 minutes (in the clear) to obtain the Geo
Sats' WAAS navigation data in order to lock on to them. In the USA,
these will be No. 35 and 47. The unit's display can be zoomed in
to 5m as compared to the eMap's 30m which with WAAS improved accuracy,
should give a better graphic of the GoTo distance at the waypoint. The
GPSmap 76 units' backlight has only a toggle on/off, unlike the G-II+ and
G-III+ that have a dimmer feature.
The GPSmap 76 has 10,000 track points in
its active tracklog. It can also store 10 reduced tracklogs that
can have up to 250 data points. These 250 saved trackpoints can be
converted up to 50 TrackBack (Turn) points. This is similar to the
G-III+, but the GPSmap 76 stores the altitude in the track log like the
eTrex/eMap series of GPS. The unit also can store 500 waypoints and
10 proximity points. Areas of recorded tracks are displayed when
the track is SAVED. The GPSmap 76 has dropped the comment field but
does store the altitude, depth and proximity of waypoints. Notice
that there is no battery voltage or battery type.
NOTE: If you upload a track from MapSource
or G7ToWin, the track will not be visible until you zoom one level.
Third-Party Software compatibility:
G7ToWin
is able to up/download (and archive) waypoints, tracks, and routes to/from
the GPS. It also allows you to show these on Street Atlas.
Screen shots are downloadable with Ver. A.00.61.
Street Atlas 8 cannot download waypoints
or routes from the unit, but it can download and display tracks. SA8 can
also calculate routes and upload them to the GPS.
Editing
NMEA:
Unless you press MENU when the NMEA Interface
is highlighted, select "Setup NMEA Output", and mark the "GPS Status (GSA,
GSV)" box, the satellites don't appear on SA Watch (or any other program).
Other users may need the "Waypoints/Route (WPL, RTE)" box also checked.
Features not available
in all Garmins:
Active-antenna jack.
Area calculation (of saved tracks)
Audible Proximity alarms are back.
Audible Anchor-drag alarm.
Course or Bearing lines can be
displayed.
Editing Lat/Long numbers is much
easier than the eTrex-series matrix-method.
Lat/Long Grid lines are available.
Lighted keys.
NMEA sentences GSA and GSV are
selectable.
The 3-D Route is displayed like
the G-III+.
50 Routes can be stored.
Waypoint averaging.
The map page can be Zoomed to 5m.
Accuracy:
Limited testing of the GPSmap 76's WAAS
accuracy with comparison to other receivers can be found (HERE).
NAVIGATION SCREENS
. ........
 .........
Satellite
Map
Nav (Compass)
Satellite Page:
This is the first screen you see after
the intro screens is the usual satellite page. This contains all
the usual data plus some more since the screens higher resolution give
a little extra room. The "D" in a signal bar indicates that this
satellite signal is provided with either WAAS or DGPS data corrections.
First across the top of the screen you get three fixed data fields. Left to right, speed, elevation and accuracy. Next line down give you status, Like 2D GPS location, 3D GPS location, 2D Differential, 3D Differential, Simulating GPS. Below this you get the usual sky view of satellites and signal strength. The sky view is on the left the signal strength is on two lines to the right. The next line below this had the date and time as set in the setup menu. And finally at the bottom in nice large font is your location in the format you have specified in the setup menu. One thing to note here is that there is no longer a DOP (dilution of precision) measurement. We liked that on the G-III+.
The menu for the satellite page give you
these options:
STOP/START SIMULATOR, NORTH/TRACK UP,
NEW ELEVATION, NEW LOCATION
The later two will gray out if the GPS
is locked on. If you only have a 2D lock then you can still enter
an elevation.
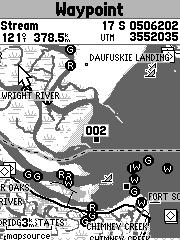
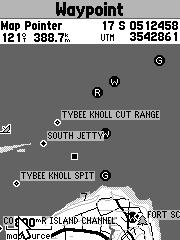
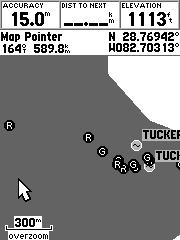
Map Page:
This is similar to most map screens on
Garmin's other hand-held mapping units. The data fields are located
at the top of the screen. If you are scrolling around the map you
will get a status line just below the data fields that to tell you the
distance and bearing to the cursor, the coordinates of the cursor and what
the pointer is pointing to. The menu for the map screen allow: FULL
SCREEN MAP, MEASURE DISTANCE, SHOW NEXT STREET, SETUP PAGE LAYOUT, CHANGE
DATA FIELDS, SETUP MAP.
Most of these are pretty self explanatory. We should mention that the SETUP MAP menu allows you to setup how most items are displayed on the screen. One new feature here is you can now have both a bearing and course line displayed on the map, one or none; a really nice feature.
Compass Page:
This page displays the user defined data
fields at the top and at the bottom the compass rosette. The compass
display has a needle that points to the goto or next route waypoint and
a compass rosette that rotates to put your current heading at the
top. Between the compass rosette and the data field is a status line
that tells you the waypoint you are navigating too. If you are not
navigating, it displays the status of your GPS lock: 2D, 3D, or differential.
The menu for this page allow these options: SETUP PAGE LAYOUT, CHANGE DATA
FIELDS.
It is interesting that the GPSmap 76 (billed as a marine unit) does not have a Course Deviation Indicator (CDI) -as is present in the Vista (hiking) and the GPS-V (auto navigation). The "compass" acts more like an Automatic Direction Finder (ADF).
**********************************************************************************************
 ...........
 ...........
Highway Page:
This is similar to the compass screen
but the bottom shows an isometric highway view of the active route.
The map is not displayed in this view. The GPSmap 76 does display
the highway made up of the active route or goto waypoints and
the tracklog. The highway is a nice wide trail with center line.
The tracklog is displayed as a very thin trail similar to the tracklog
displayed on the map screen.
The menu for this page allows these options: SETUP PAGE LAYOUT, CHANGE DATA FIELDS, SETUP HIGHWAY. The setup highway menu is where you setup what is displayed on the page. This allows you to turn on/off the display of: ACTIVE LEG, ACTIVE ROUTE, TRACK LOG, SAVED TRACKS, NEXT waypoint, ROUTE waypoints, and OTHER waypoints.
Active Route/GoTo:
The final screen is the active route or
goto screen. This is a list of the waypoints (routepoints) in the
route. If you press MENU, the menu page for the active route/goto
screen allow the following:
USE MAP, INSERT WAYPOINT, REMOVE WAYPOINT,
REVERSE ROUTE, PLAN ROUTE, and DELETE ROUTE.
By using the rocker pad left to right,
the following possible data is displayed next to the waypoint:
DISTANCE, COURSE, ETA, FUEL, LEG DIST,
LEG FUEL, LEG TIME, SUNRISE, SUNSET, and TIME TO GO.
Area Calculation:
The GPSmap 76 has an area calculating
feature, but you have to hunt for it. To use it, you
clear the tracklog and go hike around an area. Then go to Tracks
in the main menu and save the Entire tracklog. When you do this,
you will be shown a screen which has the area bounded by the track.
You can also select one of the saved tracks and find the area as well.
This is where you find the Trackback feature as well.
MENUS:
First the TRIP COMPUTER. Simple enough.
These are the logged parameters:
TRIP ODEM, STOPPED TIME, MOVING
AVG, MOVING TIME, OVERALL AVG, TOTAL TIME, MAX SPEED,
ODOMETER All of these are resetable.
The TRACK page let you see how full the active tracklog is and allows saving the compressed tracklog to an empty slot. It also lists the compressed tracks you have saved and allows track management. Management includes deleting active or saved tracks and setting up how tracks are logged.
Track logging can be setup in auto, time or distance mode. A new feature here is that in auto mode you can give it a relative frequency of plotting. Your options are: MOST OFTEN, MORE OFTEN, NORMAL, LESS OFTEN, LEAST OFTEN.
The POINTS menu allow you to list your waypoints, points of interest (POI), cities, exits, addresses, and intersections. Most of these lists will let you spell and find it and look for the nearest features.
The ROUTE page lists all routes and lets you manage and create them. The GPSmap 76 had 50 routes and each can have up to 50 waypoints.
The PROXIMITY page lets you add waypoints to the list and input a radius. An alarm is triggered if you get within the set radius. You can have up to 10 waypoints on the list.
The CELESTIAL menu lets you access the Tides, Sun and Moon and Hunting and Fishing screens.
MAPSOURCE menu lists all mapsource data loaded into the unit. You can select which maps are displayed here by checking or unchecking each of the maps in a listing. The user can press the menu button and turn on all of one type of maps like TOPO or R&R. This action will turn all other (not selected) types off. You can also select to turn all ON or all OFF..
The SYSTEM INFO brings up the Software version and unit ID number.
Finally the setup menu allows you to set all of the preferences of the unit like units, datum, and coordinates. You can also set up alarms and interface settings.
Tracklog Recordings with Various Automatic Tracklog
Resolutions on 50-Foot Diameter Circles
 ..................
'Least' Trackpoints (5)
'Normal' Trackpoints (9)
 ...
... ..
..
Odds and Ends:
A couple of quick-access features are
available. Marking a waypoint is done by pressing and holding the
enter button. This is similar to many other Garmin units and brings up
the new waypoint screen. The NAV button is similar to the function
of the GoTo button on older Garmin units. Instead of
bringing up your waypoint, LIST IT gives you the option to go to the point
menu where you can pick from waypoints, POI, cities, exits, addresses,
and intersections. Also you can choose to activate a route or track
to follow. If you press and hold the NAV button or press it twice
in a row you will active the MOB (man over board) feature.
ETA and TIME TO NEXT/DEST seem to be more accurate than estimates provided by older units. The Garmin III+ just took the VMG and figured out how long it would take to get to the next waypoint or destination. The GPSmap 76 appears to use the more accurate algorithm as provided in StreetPilot units.
Please provide comments/corrections/additions to the authors listed in the heading.